


Introduction
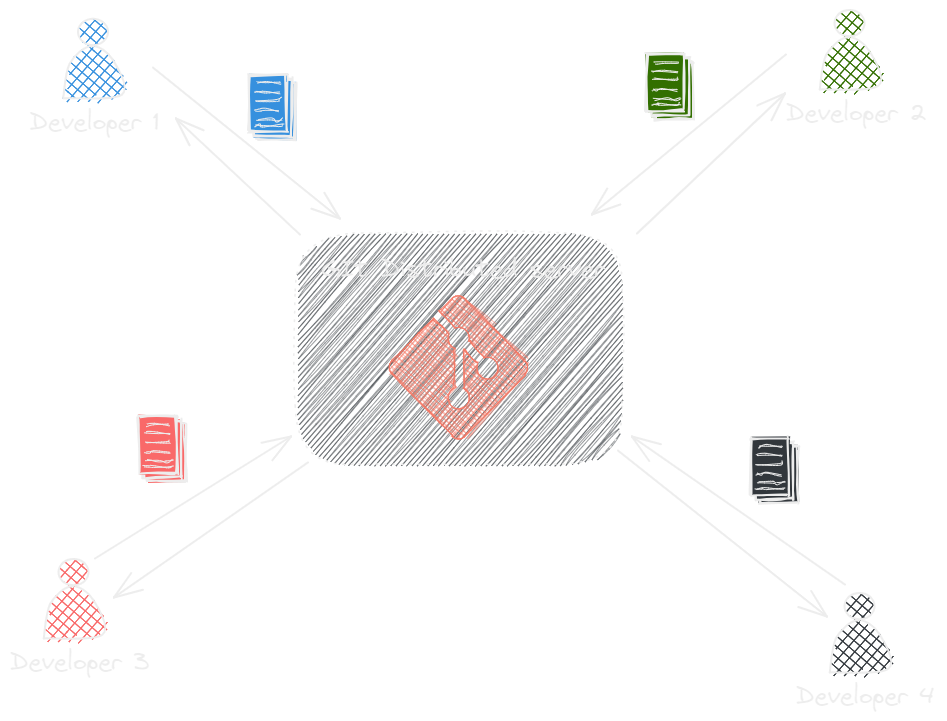
Developing code in a team, whether small or large, was quite a pain in terms of keeping track of changes and the latest code. That's where git comes in, making it easy to work and track code changes.
Git is software for tracking changes in any set of files, usually used for coordinating work among programmers collaboratively developing source code during software development. Its goals include speed, data integrity, and support for distributed, non-linear workflows .
Git is the most widely used version control system in these modern days and how could it not be when it is made by Linus Torvalds as open source project. For everyone who does not know who this guy is (but I hope there is not many of you) he is creator and lead developer of Linux kernel which is used by Linux distributions as such as Ubuntu or even Android, so I guess you can see how important this guy is. But let's continue with git which is the main topic, unfortunately this post is not about Linus, but I think he does deserve specific post :)
This post is made to help beginners to learn basics of Git version control system. Most of the companies these days cannot operate without Git, because it is version control system which help you track of code changes as well as making collaboration easier than ever before.
What is git
What is Git actually and what it allows us? Well it is specific implementation of version control system which is used to track changes in source code and it is used as distributed version control tool with which we can manage source code with ease. It allows many developers to work together simultaneously on the same code by supporting non linear development with numbers of branches.
Features
- Tracks history
- Free and open source
- Supports non-linear development
- Creates backups
- Scalable
- Supports collaboration
- Branching is easier
- Distributed development
Installation and configuration
There are different ways of installation of Git for every platform, so lets breakdown installation for most popular platforms. In this post we will cover installing on Mac OS X, Linux and Windows. After we verify that Git has been installed correctly we will configure it in order to Git knows who we are.
Install Git on Mac OS X
There are many ways of installing Git on OS X, and we will cover two most popular ways of doing so. Before you start you can check whether you already have it installed due to Apple maintain its own fork of Git
$ git --version git version 2.7.0 (Apple Git-66)
But I don't tend to use it due to being behind main Git, so I strongly recommend you to manually install it.
-
Installing via Mac installer is the most easiest way of installing it. All you need to do is to
download latest version.dmg file and follow intaller via GUI. After installing is done, go to the preffered Terminal and check version.
bash $ git --version -
Installing Git with Homebrew is my preferred way, but you need to have installed Homebrew on your machine.
Open your preferred terminal and paste following command:
$ brew install gitAfter installation is complete, verify the installation was successful by typing :$ git --version git version 2.9.2
Install Git on Linux
On Debian/Ubuntu you can use apt for installation, where git packages are available.
$ sudo apt-get update
$ sudo apt-get install git
After everything is done, verify the installation was successful
$ git --version git version 2.25.1
Install Git on Windows
On Windows there is really simple way of installing by downloading .exe installation and follow installation procedure. You can download the newest version of Git on official site
Verify that installation was successful
$ git -v
git version 2.38.0.windows.1
Configuration
Now when we got Git installed and working we must tell Git who we are which is important for Git commit to know who made commit. We will need to set up user's email and username, we can also set aliases, colors, merge tools, etc. but for now we will keep focus on the most important part and that is email and username.
$ git config --global user.name "bojan"
$ git config --global user.email "bojan@mail.com"
Now when you push new commit, Git will know your name and username so when you annotate your code you will be able to see name you set it up.
Basic commands
We will cover some of the most commonly used commands where I will try to explain as simple as I can.
- git init - Initialize new git repository. If you are creating git manually this is first command you need to run, on the other hand if you are using Github, Bitbucket or some similar git hosting tool you will skip this command.
- git clone - Create a copy of existing Git repository. This is initial step when we want to 'download' our code from e.g. Github. When we clone the project we will pull all history as well.
- git add - Move changes from working directory to the staging area. You can still prepare last changes before committing to the remote repository
- git commit - After we add our changes to staging area we can commit it to the project history with some meaningful message. If you want to make changes or forgot to stage a file to your commit use
git commit --amendin order to make changes to the most recent commit. - git push - When our commit is ready last thing is to push changes to the remote repository. You can commit multiple commits and afterwards push it all together which means that all our local changes will be moved to remote repository.
- git log - After we commit changes we should be able to see our new commit in git log. Here you will explore all previous revisions of your project.
- git status - Displays the state of working directory and staged files. You run this command in combination with git add and commit commands.
- git fetch - Download a branch from remote repository with all of its commits, but it will not try to integrate anything to your local repository. This is a great way to test changes before merging.
- git pull - You can look on this as automated version of fetch, because it will download a branch from remote repository but it will merge it automatically into your current local branch.
- git rebase - Rebasing lets you move branches around which is helpful to avoid unnecessary merge commits. After rebasing we will get linear history which is really easier to follow.
If you want to add, edit or delete commits you should use interactive mode which is normal rebase with this additional options. Use
git rebase -iin order to use interactive mode. - git reset - Revert changes to files in the working directory, resetting lets you clean up or remove changes that have not been pushed to a remote repository. The
--soft, --mixed, and --hardflags do not have any effect on the file-level version of git reset, as the staged snapshot is always updated, and the working directory is never updated.
Git workflow
In git there is three main states:
- Working directory - This is entry point where you modify files in your working directory
- Staging area or index - This is stage where we will add our file changes or snapshot of stage files
- Git directory or Repository - This is stage where our commit that have our changes will be permanently stored in our Git directory. After we push our changes to repository, other developer can pull these changes from this repository.
Now when we know different stages in Git, we can learn how workflow works.
1.) First thing is to create repository with a git hosting tool like Github,Bitbucket,Gitlab, etc. This is one way you can also create your project or use existing one, position to the project in Terminal and use following command to initialize git project
$ git init
This will create .git/ folder inside your project with following content:
 $ ll .git
total 0
drwxrwxrwx 1 basskibo basskibo 4096 Dec  6  2022 ./
drwxrwxrwx 1 basskibo basskibo 4096 Dec  6  2022 ../
-rwxrwxrwx 1 basskibo basskibo   23 Dec  6  2022 HEAD*
-rwxrwxrwx 1 basskibo basskibo  130 Dec  6  2022 config*
-rwxrwxrwx 1 basskibo basskibo   73 Dec  6  2022 description*
drwxrwxrwx 1 basskibo basskibo 4096 Dec  6  2022 hooks/
drwxrwxrwx 1 basskibo basskibo 4096 Dec  6  2022 info/
drwxrwxrwx 1 basskibo basskibo 4096 Dec  6  2022 objects/
drwxrwxrwx 1 basskibo basskibo 4096 Dec  6  2022 refs/
For details about adding git to exiting project read section 'Add git to existing project', we will continue with created repository from git hosting.
2.) Next thing is to clone the project. Cloning project in Git means that we will copy or download project to our local machine.
Use terminal command like following just add your git repository
$ git clone git@github.com:<GITHUB_USERNAME>/<GITHUB_REPOSITORY>.git
3.) Make some changes in code or in this case I will just create test.txt and enter following command in terminal and you should see output like this:
$ git status
On branch master

No commits yet

Untracked files:
  (use "git add <file>..." to include in what will be committed)
        test.txt

nothing added to commit but untracked files present (use "git add" to track)
Lets break-down this output and what it means. First line says on which branch are we ( we will cover branches in Git in next section), next line is saying 'No commits yet' which means that we did not committed any files yet and last line saying that we have untracked file test.txt which we need to add before committing which will do next.
4.) Now we need to add our changes which we want to commit, so do it so by using git add command and check git status afterwards.
$ git add test.txt
$ git status
On branch master

No commits yet

Changes to be committed:
  (use "git rm --cached <file>..." to unstage)
        new file:   test.txt
Now we can see that our test.txt is about to be committed. Lets commit it by:
$ git commit -m 'initial commit'
$ git status
On branch master
nothing to commit, working tree clean
You can see that our working tree is clean and there is nothing else left to commit.
5.) When everything is committed we can push our changes to remote repository by using following command:
$ git push origin master
Voilà! Our code is pushed on remote repository, you can go to your repository (Github, Bitbucket, etc.) which you used to create repository and check if your changes are there.
6.) When you work in team and other developer want to get copy of your changes to his local machine, he will use pull in order to fetch the newest changes.
$ git pull
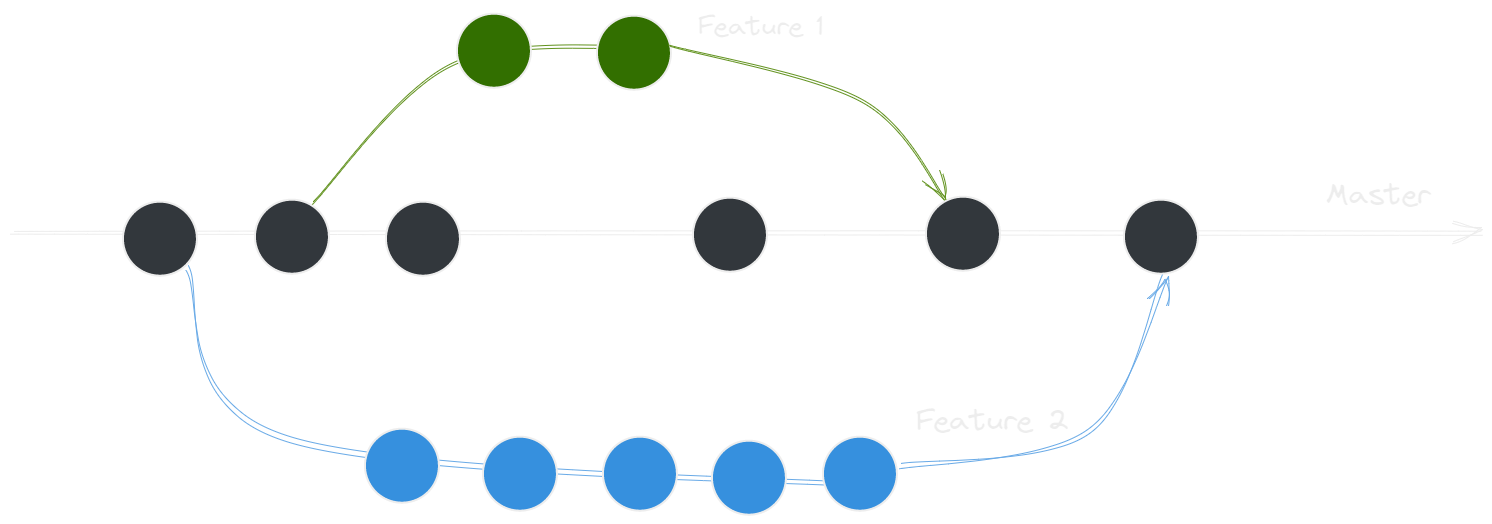
Branches
Branch in Git are used to keep your changes until they are ready to be merged into master (production branch). When you are developing new feature it is highly recommended to use different branch for example create feature branch which will be used for development. When feature is done and tested to be stable, you can merge your changes into master branch.
Git rebase and merge
Git rebase is often thought to be a magic wand of the Git, which will magically merge changes and everything will work without any conflicts. We covered basic functionality of both in the section 'Basic Commands'
but lets dive deeper and see what is real difference of these two commands which practically do the same thing. On the outside it looks as the same thing but output is very different so you should be careful when using each of these.
Git Merge
This is often the easiest way around, you will basically merge main branch into the feature branch with one-liner command.
$ git merge feature master
Pay attention that merge will create new commit in the feature branch that will tie together with history of both branches, output will be like this:
Merging is great because it will not change existing branches in any way as it could happen with rebasing, but bad side of it is that every time we need to merge our branches we will have additional merge commit. This can be polluting for the git history when our branches are very active so it can be harder to read and understand history of the project.
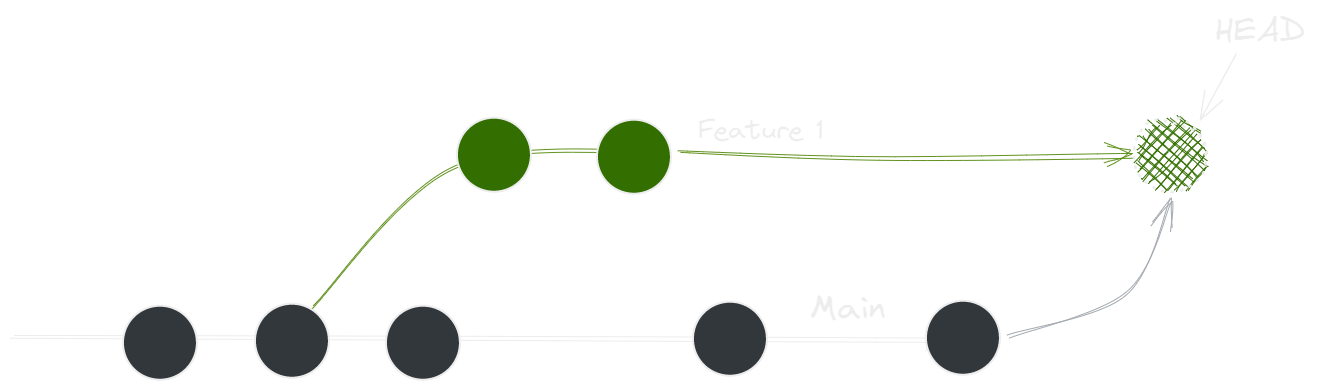
Git Rebase
Second option is rebasing which will rebase feature branch onto master branch.
$ git checkout feature
$ git rebase master
This will move the entire feature branch to the top of the master branch incorporating all of the new commits into master.
Rebase will rewrite project history by creating brand new commits for every commit in the original branch, and output will be like this:

Rebasing is great because it is much easier to read project history as well as giving us linear project history as seen in image above. You should use rebase with great care because rewriting project history can be potentially great problem for collaboration because you can lose context when changes incorporated into the feature.
.gitignore
Easy way for generating specific .gitignore for your project is by using gitignore.io. It is so easy to use and does all the job for your so I strongly recommend you to use it.