


Introduction
The webOS TV CLI (Command Line Interface) provides a collection of commands used for creating, packaging, installing, and launching web apps in the command line environment. The CLI allows you to develop and test your app without using a specific IDE.
Install @webosose/ares-cli
You can run installation via npm by installing npm package of @weboose/ares-cli by running
$ npm i @webosose/ares-cli
- verify installation by running
$ ares -V
Version: 2.3.1
Note: Node version 10.24.1 to 14.15.1 are recommended.
If that is not working, you can follow official guide for installing ares-cli.
Features
With the webOS TV CLI, you can install your apps on a target device, such as the simulator, emulator, or webOS TV device. Besides, you can retrieve, run, terminate, and remove the apps installed on the target device. You can use the CLI during any of the following stages of the development process:
Commands
Be aware that before using any of commands you need to have ares-cli installed first. Most important commands that you will need you can find in table below:
Set up WebOS project
- Start by generating project
ares //check help
ares-generate  ./ares-test-app //generate project in folder ares-test-app
- create device
> ares-setup-device
name                deviceinfo                connection  profile
------------------  ------------------------  ----------  -------
emulator (default)  developer@127.0.0.1:6622  ssh         ose

** You can modify the device info in the above list, or add new device.
? Select add
? Enter Device Name: webos_simulator
? Enter Device IP address: 127.0.0.1
? Enter Device Port: 22
? Enter ssh user: root
? Enter description: new device
? Select authentication password
? Enter password: [hidden]
? Set default ? Yes
? Save ? Yes
name                       deviceinfo                connection  profile
-------------------------  ------------------------  ----------  -------
webos_simulator (default)  root@127.0.0.1:22         ssh         ose
emulator                   developer@127.0.0.1:6622  ssh         ose
- Checkout created device:
> ares-setup-device --list
name                       deviceinfo                connection  profile
-------------------------  ------------------------  ----------  -------
webos_simulator (default)  root@127.0.0.1:22         ssh         ose
emulator                   developer@127.0.0.1:6622  ssh         ose
Configuring @webosose/ares-cli
This is partially based on: webostv.developer.lge.com/develop/app-test/..
1.) Install Developer Mode app from Content Store
2.) Enable developer mode, enable keyserver
3.) Download TV's private key: TV_IP:9991/webos_rsa and save under $HOME/.ssh
4.) As with any SSH key, restrict its access rights: chmod 600 ~/.ssh/webos_rsa
5.) You can test the key with: ssh-keygen -y -P "PASSPHRASE" -f ~/.ssh/webos_rsa
6.) Configure the device using ares-setup-device (-a may need to be replaced with -m if device named webos is already configured) PASSPHRASE is the 6-character passphrase printed on screen in developer mode app
ares-setup-device -a webos -i "username=prisoner" -i "privatekey=webos_rsa" -i "passphrase=PASSPHRASE"
 -i "host=TV_IP" -i "port=9922"
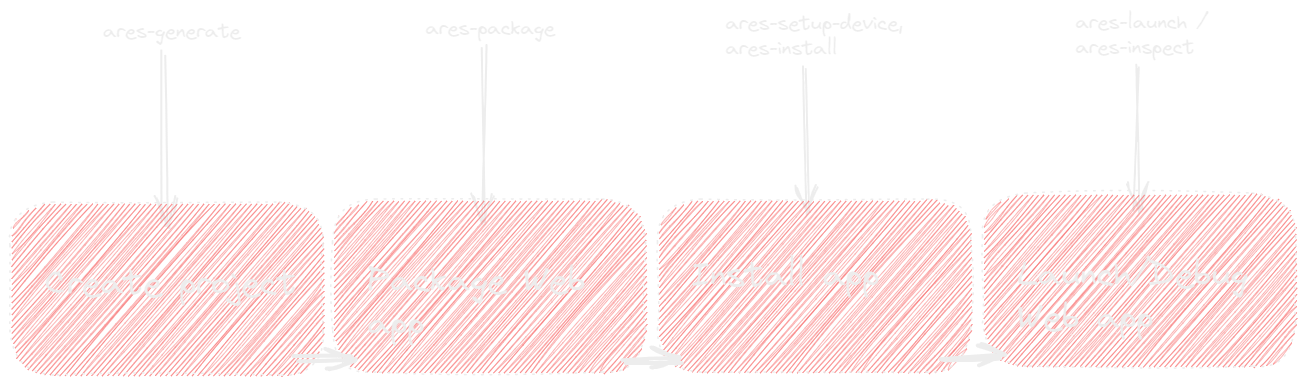
Running and installing application on LG TV
When we have our code ready for deploying it to TV, we must first package our project to .ipk file, install that .ipk to TV device and finally we can launch it or inspect it. For this last part you dont need to launch it from terminal you can launch application manually by using TV remote as well, but of course if you want to inspect it and debug application you will need to run command from terminal. Lets go step by step:
run ares-package in order to package project
ares-package ./After ares-package command is finished and we have .ipk file output, we can proceed to install application on TV
ares-install -d webos com.testwebos.app_1.0.0_all.ipkLaunch application on TV, -d parameter represent on which device you want to run (in my case device is named webos)
ares-launch -d webos com.testwebos.appinspect and debug WebOS application
ares-inspect -d webos -a com.testwebos.app -vAfter you are done you can close application by running :
ares-launch -d webos com.testwebos.app -c
Conclusion
Here it is, you should have your application started on your TV, so now you can bring your idea to life. Setup of webOS project is straight forward as you can see, if you stuck on some step, and you cannot find solution feel free to contact me and I will be glad to help if I can. When you finish developing your application next step is to go to the LG seller lounge and register your app after everything is done your app should appear at LG store. I hope I will make post about that as well in the near future, so we can close the whole LG webOS development process circle.
You can checkout original post https://www.bojanjagetic.com/post/webos-project
and find more information about webos